Affordableish Immersion Circulator [General]

2011 Apr 13
I have made a couple of sous-vide controllers like this, except that I do away with the integrated coil heaters and instead use the PID controller to control a vessel with an integrated heat source (like a rice cooker or an electric steam table) or a hot-plate. I just put the pump in the vessel.
It works very well and is super easy to build and tune. I'll be glad to advise and help you if needed.
One word of caution: if you use the pond-pumps over about 70-75 deg celsius, the plastic casings deform and the pump will stop working. There are limited reasons to go to this temp using sous-vide (veg, fruits and certain meat treatments), so you will be fine for many things.
I'm still looking for a high-temperature food-safe circulating pump.
Don't be shy if you want help.
2011 Apr 13
Should be able to build something with a fish tank or other immersion heater and a fish tank power head for water circulation.
Found this today too (2 more sous vide hacks):
www.wired.com
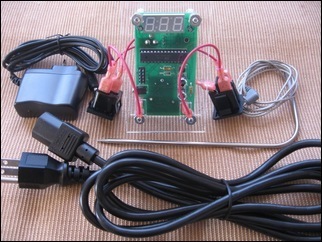
I'm pretty sure I can build a very good one for $30. I found a PID temperature controller on eBay for $20 including shipping (it doesn't require the external relay). And a J type temperature probe for $5. Both items new. It's not clear what voltage the PID runs off, (it actually looks just like the seattlefoodgeek unit) but it's most likely 12v. An old pc power supply will deliver 12v more cleanly than the PID requires. Heck I've got a few lying around, but you can probably pick one up from a computer recycler for $5. I also have a spare slow cooker, but immersion heaters are cheap too, I think I'll head back to eBay and snag one. Next I have to source a vacuum sealer.
>>>
Ok I snagged an immersion heater on ebay from Austrailia for $8, including shipping. It's listed at 2000W, 220v. I have to cut the cord anyway to run it from the PID controller, so at 110v it will run at 500W (power is the square of the voltage so 1/4 the power at half the voltage). I'm still under $40 including the heating element. And it's unlikely to burn out at 110v 500W, seeing as it's designed for 220v 2000W.
>>>
Now I wonder how necessary the water circulator is, as open water probably conducts heat very well. In a slow cooker, what all that thermal mass, it probably wouldn't be necessary. Put the food item on a rack, so there is an open space under it and the immersion heater on one side. A convection loop will establish itself around the item.
>>>
But if you do want to circulate hot water cheaply, use a heat sink fan from a pc. They are bushless and run on 12v. They can also take the heat, as Pentium D chips routinely run at 95C. Plus they can be scrounged for nothing.
>>>
Another idea is to get a cheap $10 hand mixer. Attach it to the side of the sous vide box - which BTW should be a plastic cooler to conserve heat - and have the beaters stir the liquid. Noisier that the pc fan though. And I'm pretty confident the pc fan will function very well submerged.
>>>
Another idea, even more reliable, a lot quieter (though not as quiet as the pc fan) and pleasantly white-noise-ish, is to get an aquarium air pump and airstones. Put the food items on a metal rack and under the rack put the airstones. The rising bubbles will provide a lot of water circulation. This is the basis of moving water through undergravel filters, the flow rate of which is astonishingly high. And even small bubble systems provide enough circulation to keep very big ships ice free in the winter.
Found this today too (2 more sous vide hacks):
www.wired.com
I'm pretty sure I can build a very good one for $30. I found a PID temperature controller on eBay for $20 including shipping (it doesn't require the external relay). And a J type temperature probe for $5. Both items new. It's not clear what voltage the PID runs off, (it actually looks just like the seattlefoodgeek unit) but it's most likely 12v. An old pc power supply will deliver 12v more cleanly than the PID requires. Heck I've got a few lying around, but you can probably pick one up from a computer recycler for $5. I also have a spare slow cooker, but immersion heaters are cheap too, I think I'll head back to eBay and snag one. Next I have to source a vacuum sealer.
>>>
Ok I snagged an immersion heater on ebay from Austrailia for $8, including shipping. It's listed at 2000W, 220v. I have to cut the cord anyway to run it from the PID controller, so at 110v it will run at 500W (power is the square of the voltage so 1/4 the power at half the voltage). I'm still under $40 including the heating element. And it's unlikely to burn out at 110v 500W, seeing as it's designed for 220v 2000W.
>>>
Now I wonder how necessary the water circulator is, as open water probably conducts heat very well. In a slow cooker, what all that thermal mass, it probably wouldn't be necessary. Put the food item on a rack, so there is an open space under it and the immersion heater on one side. A convection loop will establish itself around the item.
>>>
But if you do want to circulate hot water cheaply, use a heat sink fan from a pc. They are bushless and run on 12v. They can also take the heat, as Pentium D chips routinely run at 95C. Plus they can be scrounged for nothing.
>>>
Another idea is to get a cheap $10 hand mixer. Attach it to the side of the sous vide box - which BTW should be a plastic cooler to conserve heat - and have the beaters stir the liquid. Noisier that the pc fan though. And I'm pretty confident the pc fan will function very well submerged.
>>>
Another idea, even more reliable, a lot quieter (though not as quiet as the pc fan) and pleasantly white-noise-ish, is to get an aquarium air pump and airstones. Put the food items on a metal rack and under the rack put the airstones. The rising bubbles will provide a lot of water circulation. This is the basis of moving water through undergravel filters, the flow rate of which is astonishingly high. And even small bubble systems provide enough circulation to keep very big ships ice free in the winter.

2011 Apr 14

Here is one for $160 US that turns any slow cooker, rice cooker, etc under 1500W into a sous vide machine:
freshmealssolutions.com
I wish I'd known about this before buying all that stuff on ebay - unless I get an external relay my homebrew setup will only handle 800W. This handles nearly twice as much, and it's pre-built and debugged. I think it's worth it.
freshmealssolutions.com
I wish I'd known about this before buying all that stuff on ebay - unless I get an external relay my homebrew setup will only handle 800W. This handles nearly twice as much, and it's pre-built and debugged. I think it's worth it.

2011 Apr 14
Here is a kit one for $60 US (looks a bit "bush" though, and soldering required):
store.holyscraphotsprings.com
store.holyscraphotsprings.com
2011 Apr 14
And lastly, also for $60 US you can get the Ranco controller from etcsupply and wire it up yourself. It handles 1600W.
www.etcsupply.com
(My advice, get the $93.99 one. It's all done for you and tested.)
www.etcsupply.com
(My advice, get the $93.99 one. It's all done for you and tested.)
2011 Apr 14
circulation = better water temperature control and no cold spots.
If you don't really care about having even water temperature, you could find a cheap water. I bought Fisher Scientific Isotemp 110 a year ago for about 75, but never used it for sous vide...
->shameless plug, if anyone is interested in going the water oven route, I will trade mine for a good case of beer....
2011 Apr 14
I don't think circulation will be a problem at all, especially if you put a metal mesh rack on the bottom, underneath the bagged food. After all the meat, or whatever, cooks evenly, even though nothing is circulating within it.
However, the aquarium pump with airstone is the cheapest, safest and most reliable idea for circulating the water I can think of so far. There is no reason why you can't pass a tube into the crock pot for the airline, along with the temperature probe. You can use a piece of tubing from the automotive section of Canadian Tire, which will take high temperatures, instead of aquarium tubing, that likely won't take the heat.
However, the aquarium pump with airstone is the cheapest, safest and most reliable idea for circulating the water I can think of so far. There is no reason why you can't pass a tube into the crock pot for the airline, along with the temperature probe. You can use a piece of tubing from the automotive section of Canadian Tire, which will take high temperatures, instead of aquarium tubing, that likely won't take the heat.
2011 Apr 14
Good conversation here guys...some thoughts based from experience:
The controllers like Ranco etc do not have accurate enough temperature control. They are not PID...they are thermostat based. Lots of overshoot and instability due to the hysteresis required for a thermostat. I looked at this and abandoned it. You'll be ok with one of these if you are not looking to do the perfect egg, or perfect fish etc. Still I recommend going PID.
I find that water circulation does make a big difference if you have several bags in your container. Thermal convection is fine if you have racks etc that keep all bags separate and that the cooking vessel is taller rather than wider. If your bags touch too much you will get uneven cooking.
I strongly advise against buying a PID controller that uses a mechanical relay to control the 120v power. To get the temperature control you need, the relay will pulse about once per second, and the pulse may only be for a small fraction of a second. A mechanical relay either will not do this or will wear out very quickly.
An air bubbler will probably be ok in a rice cooker or tall stock pot but I am dubious about effectiveness in a wide container or a setup with many bags.
Most immersible aquarium pumps and powerheads will deform at the higher sous-vide temperatures.
I have several of these and would be happy to show folks how they work, and how simple they are to build. I even built one to control my smoker.
2011 Apr 14
Maybe I'll find a use for the PIDs after all . . . I don't know if they are mechanical relay or not. Probably not. It's cheaper to do a semiconductor relay than a mechanical one these days. But I don't think they are rated to enough wattage, about 800W I think. So I may have to use the PID to control an external semiconductor relay.
I didn't know the Ranco was not PID, but perhaps on something like a crock pot, with thermal inertia, it will be fine . . . I guess the < $100 price was too good to be true. :-) The service from the company was pretty good though. They custom built it, sent along some advice on using it for sous vide, and shipped it already USPS with tracking information, all in a matter of hours. Not even Amazon is as efficient as that !
Yes I was thinking of using a taller container rather that a wide shallow one . . . we have a plastic bin from Wal-Mart that we use for kitchen compost scraps. It's pretty durable and cheap. But I am also thinking of using picnic cooler or something insulated: less energy required and less temperature variation.
Also I would think, though I'm no expert on sous vide by any stretch, that it's the upper bound temperature that has to be respected for good results (protein coagulation and all that). So if the temperature controller has a bit of hysteresis, as long as all the variance is towards a lower temperature, it's probably fine. Cooking time will increase of course, but sous vide isn't for the impatient is it ? :-)
2011 Apr 14
Francis,
You are right, PID + external solid-state relay is the way to go. Your Ranco will overshoot on the high side since it is a full-on/full-off controller but don't sweat it, you'll figure out the right set-point.
That said, I did sous vide for quite a while using ziplock bags, a supermarket digital thermometer and my stove. It was just fine. It's just not that cool to have to hang about while you are doing a 36 hour pork belly.
Bottom-line: it will all basically work and you'll love the result.
2011 Apr 14
The sold state relay listed in there seattlefoodgeek.com is good for 25A, so at least 2000W.
single serving: you wrote "Bottom-line: it will all basically work and you'll love the result.". I'm curious to see how the results fare compared to a big green egg..
single serving: you wrote "Bottom-line: it will all basically work and you'll love the result.". I'm curious to see how the results fare compared to a big green egg..
2011 Apr 14
Thanks Single Serving ! Stove eh, sounds like watching a pot not-boil. :-)
I also found this very informative post on sous vide, which mentions the Ranco.
amath.colorado.edu
>>>>
The simplest (and least expensive) digital controllers used for sous vide are on-off (or bang-bang) controllers, such as the Ranco ETC. When tested with a steam table, I found that the Ranco ETC kept the water bath within±2.1°F (±1.2°C). This level of temperature control is sufficient for nearly all sous vide applications.
A particularly popular digital control for sous vide cooking is the PID controllers by Auber Instruments and Fresh Meals Solutions. Unlike an on-off controller, it must be tuned to the cooking device being used; I found that after tuning that an Auber PID controller kept my steam table water bath to within ±0.7°F (±0.4°C).
With all these digital controllers, I highly recommend setting the temperature offset (measured near the temperature at which you wish to cook) using a high quality digital thermometer. Indeed, at the default settings the thermistors used in the above controllers can easily be off 24°F (12°C).
>>>>>
I was also thinking of taking a page out of the heat sink book . . . a thick copper pot for thermal mass and temperature conductivity in a styrofoam cladding . . .
2011 Apr 15
Douglas Baldwin is the person behind the www site you mention. His material is quite good. I joined a group of testers when he asked folks to test his recipes before publishing his book. If you are new to sous-vide, there is not a better place to start...and do pay attention to the safety material in his book.
I am in agreement, the Ranco will work. Just for kicks though, look at the egg pictures in his book...a very small temperature makes a big difference in some foods.
I am in agreement, the Ranco will work. Just for kicks though, look at the egg pictures in his book...a very small temperature makes a big difference in some foods.
2011 Apr 15
Hi Guys,
I was able to source the 25A solid state relays on eBay for < $5. However I changed my mind and I don't think I should be using them.
Some of the other sous vide homebrews complained about their immersion heaters burning out after a few uses, and Single Serving indicated the PID controller cycles rapidly at the maintenance temperature (< 1 sec). That's not a good thing for a heater. The problem is the heater is far too strong. Imaging flipping a light switch on and off every second. Soon the light bulb would burn out.
I'm now thinking, based on keeping aquariums, that 100W is all you would need at maintenance temperature. The switch would not cycle as fast and the immersion heater would have a more reasonable lifespan. Here's the idea: Buy a 400W 220V heater on eBay from the UK or Australia. At 110v it will run at 1/4 the power (100W). Plus it will tend to be a longer lasting item, seeing as how it was designed for double the voltage and 4x the power output.
There are two functions happening here: (1) getting the immersion bath to the desired temperature, and (2) maintaining it at the desired temperature. 100W should be good for the latter, and the cycle time should be in the 10 second range depending on the setup and ambient temperature, with a 100W heat source. As for reaching the target temperature - you could simply pour in boiling and cold water until you go it right, or plug another, larger, immersion heater straight in to heat it up initially. Once it reaches target, unplug the extra heater and let the smaller maintenance heater under the PID's control take over.
Same if you use the Ranco bang-bang instead of a PID. Plug in a 100W immersion heater. And use a secondary immersion heater to get to the maintenance temperature.
>>>> Follow up idea:
Since you only need 100W for maintenance that's very easy to achieve, and safer too, with a heating element that is not submersed, such as an infrared heater. Water absorbs energy very well in the near infrared wavelengths. They make long lasting ceramic IR emitters, with a regular screw bulb base, for reptile cages. They are less than $20. With this setup, the only things going into the water bath are the temperature probe and the air line hose. But immersion heaters are probably safe enough too.
But it would be a very interesting to manufacture a sous vide setup like this commercially. Basically it's all built into a lid with the ceramic IR bulbs pointing down. If they burn out the user can simply screw in another one, keeping a few around as spares. You can't do that with an immersion heater. And if your sous vide breaks and your restaurant is in a busy interval, that's not a good thing for business.
2011 Apr 15
I have had no issues with heaters burning out and I use 25A SSRs. When up to temperature, the PID does pulse about every second or two, but for a very short amount of time, so it has no adverse impact on the heating element. It is a simple resistor and does not "care" how rapidly you pulse it, or for how long.
I suspect that the immersion heaters used by others have burnt-out due to poor construction, or more likely, due to accidentally being left on when the unit is not in water. The DIY systems that have had burnouts have no thermal protection on the heating element: rice cookers, steam tables, crock pots etc all DO have thermal protection...which will prevent burn-out (unless it has been bypassed).
All modern commercial sous-vide systems use a PID controlling a heating element, with rapid short pulses of power used to maintain temperature when at the set-point.
To achieve rapid temperature settling time, I do exactly as you suggest...throw your PID temp probe into your vessel, turn your system on and then add warm water from your tap that is close to your desired set-temp.
2011 Apr 15
You are probably right about poor construction of the immersion heaters which have burnt out. I saw those on eBay too, but avoided them. But I'm not sure a resistive element isn't impacted by frequent cycling. A light bulb is a simple resistive element, but frequent cycling does reduce it's lifespan. The light bulb which used to have the world record for longevity (Guinness Book), was something like 90 years. It was in a fire station in NY and it was never turned off.
2011 Apr 15
Ok Guys - here it is - the ultra stable $8 sous vide system.
It's $8 because most of us already have everything else that's needed.
Background: I started thinking about what Single Serving said about the PIDs firing pulses into the heater. I suppose if the frequency of the pulses is high enough, it won't impact the lifespan of the element, because the temperature won't cycle much. That's how dimmer switches work actually. They use the AC pulse frequency: 60 Hz x 2 = 120 pluses per second. But what they do is change the duty cycle, or pulse width. More pulse width, more power, less pulse width less power.
Then the idea came to me for the $8 sous vide system. Here is what you need:
1. You need a plastic picnic cooler.
2. You need a precise digital thermometer (actually you need one of these with a PID anyway, because the calibration is often off).
3. You need an aquarium air pump and airstone, and you may need by buy some high temperature tubing for the air hose at the automotive department at Canadian Tire (or maybe you have some already).
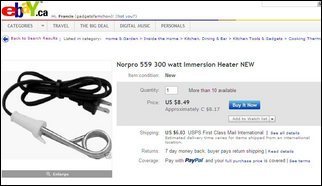
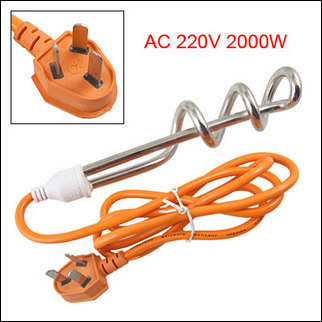
The one thing most people don't have is the immersion heater. Get this one on ebay for $8 including shipping:
tinyurl.com/3gcasrz
At 110v it will output 500W. It will last, because it's designed to take 220v and 2000W.
Find a dimmer switch (I have some lying around actually, but it should be one of the new electronic ones, not one of the old resistor types, or you will be wasting energy in the switch itself - it should still work though) and hookup the immersion heater to the switch, and a grounded power cord to the switch. Please do not leave wires exposed, use the ground line, and put everything in the metal box that goes behind the switch (the one that gets nailed to your wall studs that hardware stores sell for a couple of bucks). All this is so cheap and safe - if you don't cut corners. I don't want anyone electrocuted, and I'm not responsible if you don't play safe. So play safe.
Now, fill the cooler with water, put in a metal rack to create circulation space at the bottom, put in the immersion heater, and put in the air stone near to it.
Close the lid (but don't squish the airline) and bring everything up to the target temperature (measure it with your digital thermometer - taking the lid off momentarily to do this won't change the temperature significantly).
After the temperature reaches equilibrium you can put in your vacuum bagged food. You can remove an equivalent amount of water if you want to be really precise about it (just note the water level before putting in the bagged food; there shouldn't be much air in the bags, so it will be pretty close to the same thermal mass as the water before).
The temperature will be very stable in the circulating water inside the cooler, because the cooler is thermally isolated from its environment. It should hold to less than 1/10 of a degree C, or better. The dimmer switch will be firing 120 width controlled pulses into the heater every second - faster than a PID setup. I am pretty sure the temperature will be more stable with this setup than with a PID setup using a plastic tote, instead of a thermally isolated picnic cooler.
So there you have it. An $8 sous vide system, more stable than a $500 unit. This setup will work commercially as well. It's very simple and therefore very reliable. Reliability comes from simplicity.
Have fun, and play safe.
[Gee what am I going to do with my Ranco, my PIDs, JProbes etc. now ? ]
Additional idea 1: it may take a bit of trial and error to get equilibrium at the target temperature. So once you've nailed it, mark the dimmer switch position with a permanent marker and write the temperature next to the mark. The next time you need this temperature it will take less fiddling to nail it. Also make a mark on the inside of the cooler a couple of centimeters below the top. That's your fill line. When you put in the bagged food, take out water to bring the level back to the fill line.
Additional idea 2: for commercial systems you may require a bigger picnic cooler to hold all the food. No problem, you can use up to three of the immersion heaters above on a single dimmer switch (1500 W). Place them at different sides of the big cooler, and put an airline and airstone (use a balsa one, it will take the heat as there is no silicon or glue in them, the stem is just friction fitted) next to each one. You could just twist tie the balsa air diffuser to the middle of the immersion heater.
You know what's really funny? I don't normally eat meat or egg yolks . . . but this sous vide duck looks so tempting, I may make an exception for it:
It's $8 because most of us already have everything else that's needed.
Background: I started thinking about what Single Serving said about the PIDs firing pulses into the heater. I suppose if the frequency of the pulses is high enough, it won't impact the lifespan of the element, because the temperature won't cycle much. That's how dimmer switches work actually. They use the AC pulse frequency: 60 Hz x 2 = 120 pluses per second. But what they do is change the duty cycle, or pulse width. More pulse width, more power, less pulse width less power.
Then the idea came to me for the $8 sous vide system. Here is what you need:
1. You need a plastic picnic cooler.
2. You need a precise digital thermometer (actually you need one of these with a PID anyway, because the calibration is often off).
3. You need an aquarium air pump and airstone, and you may need by buy some high temperature tubing for the air hose at the automotive department at Canadian Tire (or maybe you have some already).
The one thing most people don't have is the immersion heater. Get this one on ebay for $8 including shipping:
tinyurl.com/3gcasrz
At 110v it will output 500W. It will last, because it's designed to take 220v and 2000W.
Find a dimmer switch (I have some lying around actually, but it should be one of the new electronic ones, not one of the old resistor types, or you will be wasting energy in the switch itself - it should still work though) and hookup the immersion heater to the switch, and a grounded power cord to the switch. Please do not leave wires exposed, use the ground line, and put everything in the metal box that goes behind the switch (the one that gets nailed to your wall studs that hardware stores sell for a couple of bucks). All this is so cheap and safe - if you don't cut corners. I don't want anyone electrocuted, and I'm not responsible if you don't play safe. So play safe.
Now, fill the cooler with water, put in a metal rack to create circulation space at the bottom, put in the immersion heater, and put in the air stone near to it.
Close the lid (but don't squish the airline) and bring everything up to the target temperature (measure it with your digital thermometer - taking the lid off momentarily to do this won't change the temperature significantly).
After the temperature reaches equilibrium you can put in your vacuum bagged food. You can remove an equivalent amount of water if you want to be really precise about it (just note the water level before putting in the bagged food; there shouldn't be much air in the bags, so it will be pretty close to the same thermal mass as the water before).
The temperature will be very stable in the circulating water inside the cooler, because the cooler is thermally isolated from its environment. It should hold to less than 1/10 of a degree C, or better. The dimmer switch will be firing 120 width controlled pulses into the heater every second - faster than a PID setup. I am pretty sure the temperature will be more stable with this setup than with a PID setup using a plastic tote, instead of a thermally isolated picnic cooler.
So there you have it. An $8 sous vide system, more stable than a $500 unit. This setup will work commercially as well. It's very simple and therefore very reliable. Reliability comes from simplicity.
Have fun, and play safe.
[Gee what am I going to do with my Ranco, my PIDs, JProbes etc. now ? ]
Additional idea 1: it may take a bit of trial and error to get equilibrium at the target temperature. So once you've nailed it, mark the dimmer switch position with a permanent marker and write the temperature next to the mark. The next time you need this temperature it will take less fiddling to nail it. Also make a mark on the inside of the cooler a couple of centimeters below the top. That's your fill line. When you put in the bagged food, take out water to bring the level back to the fill line.
Additional idea 2: for commercial systems you may require a bigger picnic cooler to hold all the food. No problem, you can use up to three of the immersion heaters above on a single dimmer switch (1500 W). Place them at different sides of the big cooler, and put an airline and airstone (use a balsa one, it will take the heat as there is no silicon or glue in them, the stem is just friction fitted) next to each one. You could just twist tie the balsa air diffuser to the middle of the immersion heater.
You know what's really funny? I don't normally eat meat or egg yolks . . . but this sous vide duck looks so tempting, I may make an exception for it:
2011 Apr 16

A 12v PC case fan works perfectly fine under water. It doesn't spin as fast as in air, but it does pretty well. This one is spinning:
Distilled water is not conductive. You may want to use distilled water in your picnic cooler, and keep it clean by rinsing the wrapped food before you submerse it. You can buy it in the big 5L jugs pretty cheaply.
I saw dimmer switches for < $10 on the Rona site as well.
If you want to close the lid of the cooler snugly, you can drill holes in the top to pass the immersion heater cord, and another one for temperature probe (digital thermometer). Using the PC fans will thermally isolate the water bath in the cooler even more than with the air stone.
UPDATE >>>
The PC fan is not turning very fast now (6 hours on). When I took it out of the water is sped up, but now it's stopped completely. I did not take any measures, such as spraying with a varnish to waterproof it, and I just used water from my tap, which is well water, so pretty hard, and a moderate conductor. Back to the air stone I guess.
2011 Apr 17
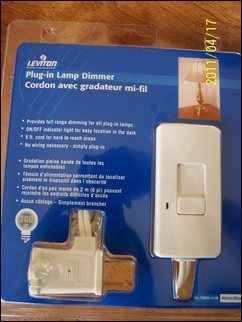
I found this pre-wired lamp dimmer at Canadian Tire today for $10. It only handles 300W, but I checked my slow cooker, and it's 250W at the maximum setting.
I've started brining some ribs to sous vide for the meat eaters in the household (I'll have a taste of it too). :-)
I'll see how easy or hard it is to get a slow cooker to equilibrate on a lamp dimmer.
It was a bit tricky to get the slow cooker to equilibrate, but I've now got it going at 130.5 F. My slow cooker has a high and a low setting. I've set it to high. The dimmer is now set at a tad less than half way.
On the dimmer the slow cooker has got a small but noticeable 120 Hz hum. I looked it up on the Lutron web site and they say it's normal for some fixtures to hum, particularly when the dimmer is near 50%. Normal power input is a sine wave, which increases and decreases smoothly. But the dimmer clips the wave, creating a sudden change in the magnetic fields, which can cause filaments to hum.
For the moment, it seems to be holding steady to +/- 0.1 degrees F, which I find surprising, as the slow cooker is not all that thermally isolated from the ambient environment. It's metal and I don't think there is any insulation in the sides.
>>>>
My son gave me a non-contact infrared thermometer (laser guided !) for Christmas, but I'd never even tried it till now. I started taking readings all over the slow cooker. It seems most of the heat transfer is via the glass lid. I can also tweak the temperature setpoint up 1.0 degree just by draping a folded dish towel on the lid. Everything happens very slowly (30 minutes), either up or down, so it's quite easy to control by the towel method.
>>>>
It's actually pretty tricky to control the temperature over longer periods of time. It tends to drift down or up a few degrees over three hours or so. You have to keep watching it. I've been trying to do it by covering the crock pot with a folded towel and removing the towel to move the temperature the other way. Since I couldn't do this at night, it got to 150F by morning. Should still be ok for the ribs though.
----------------------------------------
Ok here is what I've learned from this experiment:
1. It is possible to do sous vide in a slow cooker with a $10 lamp dimmer from Canadian Tire.
2. The lamp dimmer is ready to use out of the box, but it only handles 300W, so make sure your crock pot is less than that. Otherwise, you can buy a rotary lamp dimmer that handles 600W and wire it up to the slow cooker cord yourself.
3. Slow cookers are not temperature controlled. There is no temperature sensing in the slow cooker at all. The low and high settings put out different wattages. The low setting is designed to bring food to 170F in 4 hours. The high setting in 2 hours. Both settings will eventually bring a slow cooker full of water to just under boiling, (208F around here?). It just takes longer on the low setting.
4. The lamp dimmer gives you a way to control the wattage of the cooker in a continuously variable way, instead of just low and high setting.
5. Without temperature sensing and control, you and your thermometer play that role. Basically when the slow cooker is at the low end of your desired temperature range you turn it on, and when it's at the high end of your desired range you turn it off.
When the slow cooker is on, the temperature will rise, and when it is off the temperature will fall, regardless of your power setting.
I was initially fooled by the dimmer because it clicks on at one end of the slide, but for a short space on the slide above that, it is actually still off. I initially thought I was in some sort of temperature equilibrium because when it was set really low on the slide, I could get the temperature to fall. Actually that was just because the dimmer was off. It will fall all the way to room temperature if it's falling at all.
6. So what does the power setting do then? Answer: it changes the rate of the temperature rise.
7. The corollary is, the rate of temperature fall is governed by the insulation of the slow cooker. You can slow this down by putting towels around and over the cooker. I determined much of the heat loss is through the lid.
8. Since most of us don't want to spend 72 hours watching a pot cook ribs, we need to choose a sous vide cooking temperature range and go back to the slow cooker at intervals to maintain that range.
9. I think a good range for pork ribs is 130F - 145F. That's 15 degrees. I think 48 hours - 72 hours is a good interval. But being impatient, I'm going to finish mine tonight (48 hours).
10. Since most of us want to sleep during the night, there will be an 8 hour interval where there won't be any checking of the slow cooker at all.
11. The way to handle this is to get the slow cooker to 145F (max setpoint) before you go to bed, wrap it in towels, THEN TURN IT OFF. You can get the rate of temperature fall to be around 2 degrees F per hour with towel wrapping. That brings the temperature down to 130F by morning.
12. Or you can get the slow cooker to 130F before you go to bed and leave it on at it's lowest power setting. You can get the temperature to rise as little as 0.1 F per hour if the slow cooker is at the lowest dimmer setting and wrapped in towels for thermal isolation.
But remember I was fooled by the dimmer actually being off at the low end of it's range. You can tell if it's "on" by putting your ear against the slow cooker and listening for the 120 Hz dimmer hum. If there is hum, it's on - try moving the slider up on down to hear it go on and off. It's loudest when the dimmer is around half way.
13. Sooo . . . what I've learned is, if you want to make an "automatic" sous vide cooker you don't want to babysit, you need a temperature controller - otherwise you are the temperature controller !
Either a PID which has a chip and some "smarts" in it, or a simple on/off one (like the $99 one), will work.
If you slow things down by thermally isolating the cooking chamber (like usinge a picnic cooler), and using a gentle heating element (less than 150 Watts), the simple on/off one will work almost as well as the PID.
>>>
However a slow cooker with a $10 dollar lamp dimmer from Canadian Tire, and you as the temperature controller, will probably make a fine set of sous vide ribs too !
2011 Apr 19
Post immediately above updated from my experiments . . .
Based on what I've learned above here is my updated method for 72 hour sous vide ribs, cycling the temperature between 133F and 136F, using a slow cooker and dimmer switch :
1. Fill the slow cooker with 150F water and turn on at high setting so everything gets up to temperature.
2. Brine the ribs, then rinse, marinade and bag. You can use a ziplock bag and a straw in the corner to get the air out. Ribs are heavy, they don't float.
3. Put the bagged ribs into the slow cooker, removing water to keep the level close to the edge of the lid. There won't be any noticeable evaporation during cooking. Turn the cooker off and wrap in towels (top and sides). The reason we start the cooker at 150F is to get the core temperature of the meat up to 130F within 4 hours, for safety.
4. In two hours check the temperature. If it's between 133F and 136F, turn the cooker on. Use the dimmer switch at the lowest setting which produces a tiny buzzing sound in the cooker. And wrap in towels again for the temperature ramp up.
5. Keep checking at intervals for the temperature to reach 136F. You will come to know how long that takes (if you get the dimmer just right, it could be something like 8 hours).
6. Each time it reaches 136F turn the cooker off and let it come down to 133F (if you leave the towels off for cooling down, that maybe as little as 40 minutes). Then you can turn it back on and re-wrap it, for the ramp back up to 136F.
Don't stress too much, as long as it's below 150F and above 130F, it's going to work out.
7. Continue for 72 hours . . .
2011 Apr 21
More ideas on DIY sous vide unit:
Heating sources that won't burn out:
1. Induction cooker under the sous vide box and a plain round piece of steel inside the sous vide box aligned over it. The box cannot be a picnic cooler, because the plate has to be quite close to the induction cooker to work.
2. Outdoor halogen flood lights. I'm building a sous vide system in a picnic cooler that uses two 75W outdoor halogen flood light, pointing down into the water. They are rated at 5,000 hours lifespan (so they will burn out, but not right away, and they are easy to replace). The water will heat up by the heat of the bulb, and by the IR radiation halogen bulbs emit. IR is readily absorbed by water.
3. Aquarium heater hacked to stay on.
Water mixers:
I eventually opted for an bubbler inside a piece of plastic plumbing pipe, fixed vertically against the middle back of the cooler. At the bottom of the pipe is an "L" joint, then a short piece of piece of pipe running to a "T" joint at the bottom front of the cooler. From the "T" joint, a piece of pipe runs to each front, bottom corner of the cooler. Everything is friction fit.
Bubbles will rise in the vertical tube and draw in water from the two front (bottom) corners of the cooler and dump it out at the center back top of the cooler, creating a circulation loop. A vinyl airline hose may get soft or melt in 160F water, so find a thin, hollow, metal tube to insert down into the cooler from the top and attach the airline hose to the outside end of that. I'm now looking for a suitable (cheap) metal tube.
The smaller the bubbles, the better the water flow rater, so you'll probably want something with tiny holes in it a the bottom of the tube. I was thinking of rolling up some steel screen door material and stuffing it in the bottom end to break up the airflow.
2011 Apr 21
Lots of stuff arrived today: the PIDs, the Ranco and the vacuum sealer.
I haven't setup the PIDs yet. But I must say the Ranco is a nice unit. I've got it running an immersion heater in a picnic cooler. I've set it to 135F with an accuracy of 1 degree. Below 135F it's on. When it reaches 135F it goes off. I checked the temperature of the water with my digital thermometer, and it was 136.5F, when the Ranco was reading 135. This could be due to the probe of the Ranco reading from the bottom of the cooler instead of the top, or it could be due to the probe being insulated a little (they provide a hollow metal tube sealed at one end to house and protect the probe). In any case it's consistently off by 1.5 degrees F, so you can simply recalibrate the Ranco. I haven't done that yet, because I'm fine with 136.5. The pork ribs came out so well, I'm going to do a smoked pork shoulder, already vacuum packed from the store.
Now, I ended up using an immersion heater instead of the halogens because my halogens started getting water inside. When I brought them back to Rona, I noticed they were selling replacement heating elements for hot water tanks. I picked one rated 3000W at 240V, for $20. Since I've wired it up to 110v, it's now working for me at 750W. But that's quite a bit more than my halogens, so the water ramped up from room temperature to 136.5F pretty fast. At 136.5 the Ranco comes on for about 1 minute, then goes off for 15 minutes, in a repeating cycle.
2011 Apr 23

Ok here are some pics. It's kind of moot because I thought of something better since: cheaper and doesn't damage the picnic cooler at all, and gives super temperature accuracy.
To the left is my first attempt at a halogen heater for the sous vide picnic cooler.
It didn't work, because the heat of the bulb started softening the plastic lid where it was touching. I solved that problem by getting two metal eye bolts, where the diameter of the eye fits the neck of the bulb. The bulb goes into the eye, the bolt part gets shoved into the narrow space separating the top and bottom of the lid, and the socket fixture gets screwed to the other side. This supports the bulb without it touching the plastic. It worked.
But another problem developed with this setup. When I tested it, water started getting into the bulb. Even though it was rated as an outdoor bulb, apparently they are not perfectly sealed. Surprising. Even dollar store light bulbs are sealed. I returned the bulbs and went with the immersion heater setup I have now.
2011 Apr 23

The is the setup I have now.
To the left you can see the detail of the circulation system.
Actually I made two small tweaks to it since.
Everything is friction fit, so I rotated the bottom part of the "T" so the open ends (cut diagonally if you will notice) faced the other way, towards the front side of the cooler. It fit into the rounded corner of the cooler nicer that way.
The other tweak is that I used a larger diameter tube for the riser pipe (the next size up), with an adapter coupling to join it to the "L".
2011 Apr 23

Here is the top from the outside, showing the immersion heater wired in.
Don't laugh. That is a plastic peanut jar from Costco. Actually I had bought a really nice plastic box from the dollar store to use for enclosing the top connection, but when I went I started cutting it with a knife, the plastic cracked. So I snagged the peanut jar from the recycling. It's actually much stronger. I couldn't get the knife to cut into it at all. So I got my dremmel and used it as a spin saw to cut out the opening. The heater base is attached to the lid with screws, and so is the peanut jar. I filled everything all around the fixture base with a generous amount silicone sealant.
Don't laugh. That is a plastic peanut jar from Costco. Actually I had bought a really nice plastic box from the dollar store to use for enclosing the top connection, but when I went I started cutting it with a knife, the plastic cracked. So I snagged the peanut jar from the recycling. It's actually much stronger. I couldn't get the knife to cut into it at all. So I got my dremmel and used it as a spin saw to cut out the opening. The heater base is attached to the lid with screws, and so is the peanut jar. I filled everything all around the fixture base with a generous amount silicone sealant.
2011 Apr 23

This is a pic of the underside.
You can see the airline hoses and temperature probe in this picture. I got that hose from Rona and it's taking the heat nicely. It was 30 cents per foot.
My air pump had two outputs, so I ran one into my circulation gadget and the other I just put in the bottom corner near my smoked pork shoulder roast.
2011 Apr 23

Here is another pic.
Notice there is a really good circulation of the water, which is evident in the pic.
That metal rack I got from wallmart for $5. I think it's a dishrack. I didn't really need it for the roast, but it could be handy for putting other items in, separating them, and keeping them from floating.
The cooler is 26 Liters. It's bigger than a crockpot and should be ample for home use. I think I can cook a whole turkey sous vide in it.
2011 Apr 23
But as I said - got a better idea now, that doesn't damage the cooler at all and gives even better accuracy.
I read about people using their oven to do sous vide. You put your food into a large metal pot with a lid and put that in the oven.
Unfortunately, didn't work with my convection oven as it won't accept temperatures under 200 F.
But you can easily make something like this in a large picnic cooler. You will need a cooler large enough to hold your pot. I would also put a metal rack under the pot so the air can circulate all around it and reach it from all sides. Use a pot with a metal cover, so the heat transfer is good from the top too.
Next we need a heat source. How about an electric hot air corn popper? These are about $15 new at Zellers, or $5 - $8 at Value Village. High temperature fan included. :-) See? Everything is much simpler, and safer electrically, working in air as the circulating fluid instead of water.
We want to heat up the air in our cooler to our target temperature. The pot of water and food will also be heated to the same temperature before being placed in the cooler.
I've already established the Ranco unit is very good (on the other hand, the PIDs from eBay have been nothing but trouble - poor instructions, and the temperature probes have intermittent faults so they go nuts if you giggle them or are rough with them - but that's another story). The Ranco can be programmed to hold temperature within 1 degree F. It can overshoot (which it does with my 750 W immersion heater by 1.5 degrees over 15 minutes - no big deal as I'm not cooking eggs).
But here's the thing. The specific heat of water is 4 times the specific heat of air, by mass. And a cubic meter of water has almost 800 times the mass of a cubic meter of air (1000 kg vs 1.275 kg per m^3). So let's say you got a large 90L picnic cooler and you put in a 20L pot of water. You have 5 times the volume of air as water in there, but the thermal capacity of the water is 3,200 times that of the air, for a net ratio of thermal capacities of 640.
You are driving the system by heating and controlling the temperature of the air. If you can hold the air temperature to 1 degree either way, the water will react 640 times less to the same energy. Theoretically, it should hold to 1/640 th of a degree either way.
I am going to try this. Even though I'm happy with my immersion heater setup, there is no reason why I shouldn't have more than one sous vide device, :-) as I may want to cook different items at different temperatures for one meal. There is a nice video on cooking a turkey sous vide online here:
That guy is pretty good with the knife isn't he?
It's cut up first and the different parts - such as the breast vs legs are done at different, optimum, sous vide temperatures.
The test of accuracy will be how my new setup cooks eggs.
2011 Apr 23

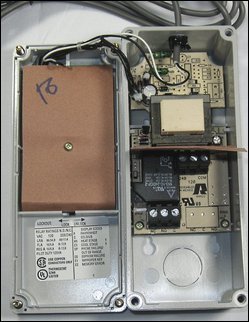
Francis, I love your energy and creativity. Seeing as I'm set-up for doing lamb racks this weekend, I thought I'd post a pic of my set-up. It is a commercial food warmer & PID mounted in a box which controls 1/2 of the 120v household outlet seen on the side of the box. The controlled outlet powers the food warmer, and the uncontrolled outlet powers the circulating pump. I use an RTD sensor and get 0.1 deg C static temp control and zero overshoot.
2011 Apr 23

...and here is the interior wiring of the controller box. You can see the PID, the Solid-State Relay (SSR) and the outlet. The advantage of a self contained box like this that you can re-use this box for pretty-much any temperature control task. I use it to control a hotplate, rice-cooker, my meat-curing fridge, the temperature of my smoker etc... highly versatile. I should have said above that I get 0.1 deg C overshoot.
2011 Apr 23
Nice setup SS. I see two line going into the corner. One must be the temperature probe and the other is for your water pump?
I'm also interested in what dishes you have tried sous vide (with times and temperatures) and how they turned out.
I'm thinking I could even make school lunches for the kids sous vide (cook, then chill). They could just cut open the pouches and eat directly with a spoon.
I'm also interested in what dishes you have tried sous vide (with times and temperatures) and how they turned out.
I'm thinking I could even make school lunches for the kids sous vide (cook, then chill). They could just cut open the pouches and eat directly with a spoon.
2011 Apr 24
With regard to the cook-chill and re-serve kids lunches: this is VERY high risk. Doing this improperly can be fatal. Children and people with suppressed immune systems are most susceptible to the bacteria that can thrive if this is not done properly.
You really must read, understand and be meticulous about chilling, storing and re-heating.
Many non-industrial operations, including restaurants limit sous-vide cooking to cook-then-serve to avoid possibility of botulism etc. that is greatly increased by improper chill and hold.
This is not something to experiment with outside of a professional food-science lab.
2011 May 5
You can get the ETC Supply Ranco, prewired, but without the thermowell, for $75:
www.etcsupply.com
The thermowell is just a hollow metal tube, closed at one end, that you slide the temperature probe into to protect it. I think you can make a perfectly good one for a few bucks, from some copper pipe, by soldering an end cap on.
www.etcsupply.com
The thermowell is just a hollow metal tube, closed at one end, that you slide the temperature probe into to protect it. I think you can make a perfectly good one for a few bucks, from some copper pipe, by soldering an end cap on.
2011 May 13
Another heating option:
tinyurl.com/3jq29wb
You can get the 300W, 110v model for the same price (see item description).
It's easy to "hack" this heater to stay always on. The setting knob has a small screw in the end, take it out. Gently pull the rubber cap off the top of the heater a little ways. Put the setting knob back on (without tightening the screw) and turn it clockwise until it's tight. Basically taking the knob off and pulling back the cap lets you turn the knob past the plastic high temperature stop, to set the thermostat as high as it will go. Now screw the knob back on and push the cap back on. You are done. You have a long lasting 300W immersion heater for sous vide.
2011 Jun 4
p.s. plastic plumbing pipe and and airstone for circulation work well, but you do need it. I mesured a 10 degree C difference between the top and bottom of the cooler with the airstone off (I guess the water stratifies in layers). With a simple "L" shaped pipe, sucking for the bottom diagonal corner, the temperature difference is less than 0.5 degree C and it's inverted (hotter at the bottom).
The cheapest place I found to buy a good airpump is PetSmart over on Merrivale (Top Fin Brand). You can get water tubing that can take high temperatures at Rona very cheap as well.
I'm on well water, so my airstones tend to clog up at sous vide temperatures, from mineral deposits. Putting them in hot vinegar once in a while restores them.
I've found ribs come out better at 62C than 55C. Try going 72 hours for really tender ribs.
I also think you can do vegetables at 55C for a couple of hours to pasteurize them, without any loss of crispness - in case the German E. Coli bug ever comes over here (which it probably will in time).
2011 Jun 17
www.theweathernetwork.com
June 15, 2011 Livermore, California (Reuters) Livermore, California gears up to celebrate a bright ray in the town, a light bulb which has been burning since 1901.
The bulb has become a major tourist draw in Livermore, California
The Northern California town of Livermore is once again preparing to celebrate a light bulb that has been glowing for more than a century. The four-watt workhorse has shone more-or-less continuously since 1901.
Nobody knows how it's possible. It is a 60 watt bulb and it's only turned on for about 4 watts but nobody knows why it keeps burning. We've had scientists from all over the country look at this light bulb, of course nobody has ever been able to touch this light bulb, said Lynn Owens, a retired division chief with the Livermore Fire Department and chairman of the town's light bulb centennial committee.
Livermore's favorite light bulb, which will be honored on June 18, was first installed in a local fire station in 1901, the gift of a local businessman. Since then, with the exception of a brief period in 1903, a week or so in 1937 and some power outages between then and 1976, the light has been on.
The handblown globe, declared the oldest known working light bulb by the Guinness Book of World Records, blinked out briefly in 1976 when it was moved to a new fire station in this town about 45 miles (72 km) east of San Francisco.
It has become a major tourist draw for Livermore, and a celebrity in its own right. Comedy Central's The Colbert Report did a comedic feature on the bulb's 110th birthday.
2011 Jul 2
Wow, you guys really went into it. I was going to build my own unit but the fire hazard worry of leaving something untested like that on for 24-72hrs was too much for me. I figured for the price I'd rather have some peace of mind. So I opted for the FreshMealsSolutions SousVideMagic 1500D PID controller. I bought just the controller initially and used it with a rice cooker and a slow cooker. The slow cooker took forever to reach temperature and regain temperature after putting in frozen food. The rice cooker was way quicker and was definitely the winner. I used a cheapo Black and Decker model 35.00 and it was perfect.
What I found limiting in both the 7quart slow cooker and the rice cooker was the size. You couldn't put a decent sized set of ribs in it. So I sold myself on buying the rest of the kit from Frank at FreshMealsSolutions.. I basically ended up getting the kit.. for 299.00
The FMM sous vide kit consists of:
SousVideMagic 1500D temperature controller with one extra spare sensor.
FreshMealsMagic (FMM): integrated 1500W/110V heater and air stone bubbler.
Air volume adjustable air pump (totally silent).
18L food safe/heat resistant polycarbonate pot. (Larger 22L to 120L pot is available upon request).
It comes from Toronto so it was next day shipping. The 1500D that I originally ordered was free shipping but the remaining parts were 20.00.
Anyhow I'm super pleased with it, and have done a number of 72hr cooks without issue. Like you've suggested Francis it uses a air bubbler to circulate the water. I chose it over the Sous Vide Supreme as it's more versatile as it can do larger cuts, and it is cheaper. 300 vs 450. Plus over the Sous vide Professionals and SWID units it is much quieter.
I'll take pics and post shortly. I only wish it was a bit cleaner looking in terms of wires.. and perhaps not LIME GREEN.. yes.. serious head scratcher on that choice.
2011 Jul 3
I've done the following Sous Vide. Some finished in oven, others with a torch, some via cast iron pan.
-Veal Chops -1hr to 1hr 40min. Done from frozen
-Veal short ribs -72hrs, way too long they were too tender
-Pork Ribs back -72hrs, amazing. Best ribs I've ever made hands down
-Pork loin chops -24hrs, tender, but dry. This appears to be a common issue.
-Prime Rib roast -24hrs, way too long, this was a AAA Sterling Silver prime rib and it was mushy from being overcooked. Higher end cuts don't benefit from lengthy cooks
-Prime Rib steak -1hr to 1hr40min fresh or from frozen. Amazing
-Ribeye - same as above
-T-Bone/Porterhouse -same as above, the filet is mindblowing.
-Chicken thighs - 2hrs from frozen
-Chicken breast - 1hr to 2hrs fresh/frozen. AMAZING.. crazy juicy. The next day in a salad or in pasta or anything its amazing..
2011 Jul 3
Hi Ravi,
You didn't give the temperatures . . .
I've done fish, from frozen 52C for 1 hour. But crappie at this time and temperature from fresh comes out mushy. Vacuum packed fish can be bought at Costco with marinades already sealed with each portion. I recommend the keta salmon. Catfish done sous vide simply rubbed with lemon pepper comes out really good.
Ribs 55C for 48 hours (good, but my son prefers it more tender)
Ribs brined overnight in 10% salt solution with liquid smoke added, then 62C for 60 hours. Very good - best I've tasted.
Fresh salmon from costco, brined for 1 hour, vacuum packed and then 52 C for 30 minutes.
Steaks at 55C for 1 hr then grilled . . . but we haven't eaten beef in years, so they tasted terrible and we couldn't eat them. If you haven't eaten beef for a long time it tastes absolutely revolting. :-(
Carrots at 83C for a few hours (can't remember exactly) - very strong carroty flavor.
Chicken at 55C for 1hr - 4 hours. Very tender, almost spongy texture. Good way to do chicken before cutting into small pieces for fried rice.
Whole turkey pre-thawed in fridge - 60C for 4 hours then 55C for another 6. After that 45 min at 480F in a convection oven to brown. Very good, moist, good texture for the white meat. dark meat could be more tender . . . Similar to a brined, barded turkey done in a convection oven, but less salty. My wife always complains about brined turkey being salty.
Eggs in shell at different temperatures - fun to do. I got custard like whites and yolks in shell by using a combination of sous vide and microwaving for 3 seconds.
Duck breast, skin side scored, spiced then at 55C for hour. Render the skin side golden for 5 minutes in hot oil afterwards, slice, add orange marmalade or another fruit jelly / glaze on the side. Superb !
2011 Jul 3

I've done most of my stuff at 135. It seems to be the ideal temperature for me. Though I'm thinking of upping it slightly for the beefs since I like a bit more towards medium then rare. Chicken at 140. I've also done shrimp at 140.. Sous Vide Shrimp are amazing. Though I think they'd benefit from marination since they only take so much of whatevers in the bag. I've lately taken to just lemon, garlic, butter, pepper and salt. I did some Jerk shrimp and some other creations that weren't impressive at all.. I think it may also be that I've either finished with a Iwatani butane torch or not finished them at all. I find the butane torch gives the food a certain flavor.. Many people rave about it but it's not all that.
I've attached a photo of the setup from last night doing a 48hr set of beer ribs. They'd just gone in and the temp was still on it's way up.
Currently I've got a rack of lamb, those beef ribs, and a large chicken breast all happily cooking along at 139 in that bin.
Of note, I've found soy sauce to really do wonders via sous vide.
2011 Jul 9
I've been away at the cottage, where I tried sous vide with just a candy thermometer. It worked for fish (trout filets at 52C for 20 min) in a large pot of water on the stove, but not for duck in a dutch oven filled with water and the lid on, inside a regular oven at 150F. The duck came out overcooked. There was too much hysteresis in the oven temperature (=/- 15F).
Ravi,
I tried ribs at 135F for 48 and and 72 hours. They were tender but lacked that "juicy" texture and flavor. To break down the connective tissue you need to get it up to 60C (140F). I've done ribs at 62C for 60 hours after brining overnight and they are really, really, good. Really !
Fish I've been doing at 53C, but I recently tried trout at 50C (fresh not frozen for 20 minutes) and it's even better.
In your picture I can see the bubbler, but I don't see the heating element. Is it an immersion heater? I'm also thinking a induction heater would work well.
2011 Jul 17
Hi Yan,
Well at least you are having fun ! :-)
I've got spare PID, a nice one that runs on 12v. It handles about 800W on an internal relay. I also have some SSRs if you want to go past 800W.
And I got some bang-bang controllers (accurate to 1/10th of a degree C) that run on 220v. A high temperature probe is attached an no tuning required.
The PID is programmable for a variety of sensor types, including J and K.
What is the wattage of your heater? Did you try the PID without the heater connected to see if it was switching on and off as the temperature changed?
I know the wiring diagram of my spare PID quite well, and I've also figured out how to tune it for my setup (which cools very slowly because it's in a picnic cooler). My setup is mainly P, with some I and very little D. I was able to tune it manually better than the auto-tune algorithm.
I'll figure out what I paid, you can have the stuff at cost.
-------------------------------------
I've been doing sous vide regularly. I've finished things in a wok in EV oil, but lately I starting using a chef's butane torch. I spray on some Pam (Canola Oil) and sear with the torch. The result is pretty good and it's fun to do too.
_____________________________________
I finally got my ultrasonic transducers today, for marinading.
2011 Jul 19
Hi Yan,
Thanks for dropping by today. Good to meet you in person.
One thing I forgot to mention is you need to put an heatsink on your SSR. You can probably salvage one for free from an old computer's cpu.
If you heating element is less than 800W I would just run without the SSR. SSRs are not always better. For one thing when the fail they fail closed (switched on), whereas a mechanical relay fails open (switched off).
The PID I sold you works on the duty cycle principle. You set the cycle time (up to 120 seconds). The PID will turn on and off at most once in that time period. The length of time it stays on in that period is governed by the P setting.
Even so (surprisingly) mechanical relays often have a longer rated lifespan than SSRs.
2011 Jul 19
Yan,
I gotta go the other way. I recommend an SSR, because the PID will want to tune to a very short duty cycle, which the relay will not like very much. At least, that's my experience after having built several of these. I use the relay for controlling the temperature in my meat-curing fridge, because compressors etc need a decent run time, and you really don't need that accurate temperature control, so the advantages of an SSR are probably not worth the cost.
I gotta go the other way. I recommend an SSR, because the PID will want to tune to a very short duty cycle, which the relay will not like very much. At least, that's my experience after having built several of these. I use the relay for controlling the temperature in my meat-curing fridge, because compressors etc need a decent run time, and you really don't need that accurate temperature control, so the advantages of an SSR are probably not worth the cost.
2011 Jul 19
Hi SS,
Actually with the model of PID sold to Yan you can set the cycle period (the default is 4 seconds, but you can set it up to 120 seconds). It will only turn on and off at most once in that period (at most once per 120 seconds).
In my picnic cooler setup with an 800W element, when it is at the setpoint it comes on for about 10 seconds every 120 seconds, and it holds the temperature within +/- 0.1 C with that 120 second cycle time.
This is the manual for it: www.sestos-hk.com
The manual has a translation mistake. "P" is the proportional term, "M50" is the Integral term and "t" is the differential term. "Ctl" is the control period, which is defaulted to 4 seconds, but can be set to 120 seconds (which is where I have it on mine).
The "P" term is given in 0.01 s/C (seconds per degree C). If the temperature is off by minus 0.5 C, the "P" term is set to 3000, and the "Ctl" term is set to 120, then the heater will come on 15 seconds out of 120.
Also note the life expectancy, mechanical is rated at 10,000,000 operations minimum. Electrical 100,000 operations minimum.
2011 Aug 2
What is the maximum Wattage immersion heater I can use with this PID cgi.ebay.ca running on 120v ?
2011 Aug 2
About 800 Watts on the internal relay, if it's the one I sold you. However you can use the internal relay to gate the SSR and go up to 2000 Watts. However a caveat is that heating elements, when cold, have a much lower resistance than when hot and they may draw a lot of current in a spike initially.
800 Watts is plenty for a sous vide setup in a picnic cooler though. A regular crock pot runs on 250 Watts.
I looked at the writeup for the PID in your link, and it says SSR output. The output will deliver 12v when on and nothing when off. You hook those to the gate on your SSR. Your SSR should be able to run up to 2000 Watts heating element. (volts x amps = watts) your SSR can handle 25A x 110v, but you should leave a margin of safety. It also has a relay output, but it doesn't say how many amps it will handle.
Are you really shopping for another PID? I can give you a hand if you like, if you get tired of going though PIDs. But as long as you are having fun and learning why not?
Oh, one very important thing, you need to put a heatsink on your SSR or it will burn up. Salvage one from the CPU of an old pc and attach it to the metal back of the SSR. If you have heat sink paste or anti seize compound put a bit between the two as well.
2011 Aug 7
Here is a new unit commercial unit called Aquachef for $140.
It comes with valved vacuum bags and a hand vacuum pump, a butane chef's torch, a digital thermometer, and a bunch of cookbooks too!
www.aquachef.com/index.php
I think this has reached the "Affordable" range.
I use my homebrew system a lot.
It's easier than regular cooking, as you can put frozen items directly into the water bath, then forget about it and go do something else for a few hours . . . and then it's done.
2011 Aug 12
Another Idea for a poor man's sous vide water oven:
They are a bit on the small side (3L or 4L), but any deep fryer with a rotary temperature dial should be usable as a poor man's sous vide.
Use a digital thermometer to get the temperature setting just right.
You can even poke in an air stone where the basket handle comes out if you like, for water circulation.
Should be great for doing some sous vide duck !
2011 Aug 24
Im not sure if my temperature variations are due to my probe. Last night, I recalibated it using boiling water. Water in Ottawa(375ft evl.)should boil around 211F.
This morning, I tried the same experiement and it was once again off calibration by 20F. Does anyone has any ideas as to what would cause my probe to have such different readings...
This morning, I tried the same experiement and it was once again off calibration by 20F. Does anyone has any ideas as to what would cause my probe to have such different readings...
2011 Aug 25
Try putting an immersion blender into the water and see if that stirs it enough to remove the temperature layers.
My system uses a bubbler for circulation too, but the bubbles are confined in a riser tube and they suction water from the bottom corner to the top opposite corner. Maybe if bubbles rise freely (not confined in a tube) the water simply flows around them and let's them go by.
My system uses a bubbler for circulation too, but the bubbles are confined in a riser tube and they suction water from the bottom corner to the top opposite corner. Maybe if bubbles rise freely (not confined in a tube) the water simply flows around them and let's them go by.
2011 Aug 25
@Yan, Yes check the probe type setting.
But perhaps the probe is faulty. I have another one you can have.
I also have some K probes (not in a metal casing - so I made a copper thermowell ). I use the K probes in my setup and they are accurate enough.
Another possibility is the springy part at the top of the probe is not meant to be submersed in water. You could let it dry out and see if it recovers.
. . . and another possibility is the PID could be faulty. The J probe is pretty simple actually, it's just a junction of two dissimilar metals - a thermocouple - that generates a current when heated. We could try a second J probe on the same PID and see if it also drifts. Or you could try the same J probe on your other PID.
2011 Aug 28
Some thermocouple information:
en.wikipedia.org
Chart converting J Type Thermocouple voltages into temperature:
www.pyromation.com
So at 150F your probe should be producing 3.5 millivolts, which you may be able to measure directly with a digital multimeter.
en.wikipedia.org
Chart converting J Type Thermocouple voltages into temperature:
www.pyromation.com
So at 150F your probe should be producing 3.5 millivolts, which you may be able to measure directly with a digital multimeter.
Yan
It can't help but see a resemblance between this one and Scott Heimendinger's seattlefoodgeek.com 75$ DIY fix... still, its nice to see these becoming more and more affordable.